Deployment statistics and how to get them from octopus deploy

Introduction
2019 was a great year for my team at the bank. We delivered features that our merchant’s and customer’s loved while at the same time fixing issues that were inconveniences for them.
My team is doing DevOps, microservices and a bunch of other of last year’s buzz words. If you want to know more about how we work, check out this article by my colleague David.
One of our missions is to “Deliver value each day” to our customers and based on the statistics from 2019 I say we did a pretty good job.
Our deployment statistics
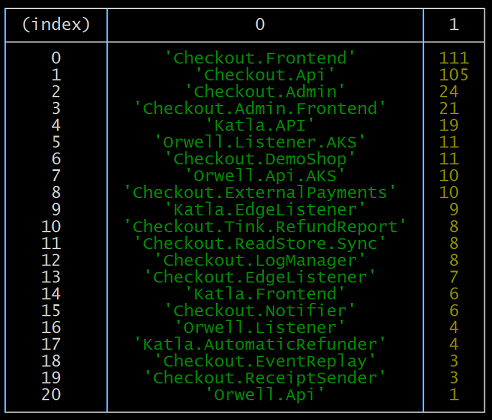
Amongst our 21 microservices that compose our product we did 389 deployments to production! Sweden had 253 working days during 2019 which gives us on average ~1.5 deployments to production per day.
Not all our commits end up directly in production though. We also did:
- 1260 deployments (~5 per working day) to our continuous integration environment.
- 482 to our environment for external testing (~1.9 per working day).
How to download statistics from Octopus Deploy
We use Octopus Deploy for all our deployments and the Octopus API supports a number of ways to get statistics on deployments. The one I used to get the above data is api/reporting/deployments/xml. This API gives us a XML file containing all deployments ever performed by Octopus. We can use this file to analyze, filter and aggregate the data to get the information we want.
To access this API you need to create an API key in Octopus. Log in to Octopus, click on your name in the upper right corner and select Profile. Click on “My API keys” followed by “NEW API KEY”. Optionally give the key a name and copy the key for the next step.
Use your favourite rest client (e.g. Postman, Nightingale, cURL or Invoke-WebRequest) to perform a GET request for https://[your-octopus-domain]/api/reporting/deployments/xml. Add the API key from step 1 as a custom header named X-Octopus-ApiKey and save the response body to disk.
Example using Invoke-WebRequest:
Invoke-WebRequest https://<your-octopus-domain>/api/reporting/deployments/xml
    -Headers @{'X-Octopus-ApiKey'='<your-api-key>'} -OutFile deployments.xml
How to work with the downloaded statistics
The XML file from Octopus looks something like this:
<Deployments>
    <Deployment>
        <DeploymentId>Deployments-9168</DeploymentId>
        <DeploymentName>Deploy to PROD</DeploymentName>
        <ProjectId>Projects-44</ProjectId>
        <ProjectName>My.Project</ProjectName>
        <ProjectSlug>my-project</ProjectSlug>
        <TenantId />
        <TenantName />
        <ChannelId>Channels-44</ChannelId>
        <ChannelName>Default</ChannelName>
        <EnvironmentId>Environments-1</EnvironmentId>
        <EnvironmentName>PROD</EnvironmentName>
        <ReleaseId>Releases-6210</ReleaseId>
        <ReleaseVersion>0.0.1848</ReleaseVersion>
        <TaskId>ServerTasks-59387</TaskId>
        <TaskState>Success</TaskState>
        <Created>2019-01-02T09:19:42</Created>
        <QueueTime>2019-01-02T09:19:42</QueueTime>
        <StartTime>2019-01-02T09:19:42</StartTime>
        <CompletedTime>2019-01-02T09:20:32</CompletedTime>
        <DurationSeconds>50</DurationSeconds>
        <DeployedBy>Stefan</DeployedBy>
    </Deployment>
    ...
</Deployments>
Since it’s an XML file we could use any language we wish to process the data, in our case we put together a simple Node script. The script is shown below and can also be downloadedhere. Modify the filterConditions function to change how to filter the data and countByProjectName if you wish to aggregate differently.
const xml2js = require('xml2js');
const fs = require('fs');
const xmlFileName = 'deployments.xml';
const environment = 'PROD';
const year = '2019';

xml2js.parseString(fs.readFileSync(xmlFileName), function (err, result) {

    if (err) throw err;

    var filteredDeployments = result.Deployments.Deployment.filter(filterConditions);

    var projectAndDeployCount = filteredDeployments.reduce(countByProjectName, {});

    console.log('Total successful deploys to ' + environment
        + ' in ' + year + ': ' + filteredDeployments.length);
    console.table(sortByMostDeploys(projectAndDeployCount));
});

function filterConditions(deployment) {
    return deployment.TaskState[0] === 'Success'
            && deployment.CompletedTime[0].startsWith(year + '-')
            && deployment.EnvironmentName[0] === environment;
}

function countByProjectName(state, value) {
    var projectName = value.ProjectName[0];
    if (typeof state[projectName] === 'undefined')
        state[projectName] = 1;
    else
        state[projectName]++;
    return state;
}

function sortByMostDeploys(projectAndDeployCount) {
    return Object.entries(projectAndDeployCount).sort((a, b) => b[1] - a[1]);
}
Put the XML file from Octopus (named deployments.xml in the script) in the same folder as the script and run the following from CLI (ignore any warning that package.json does not exist):
npm install xml2js
node index.js
A nice table will be shown on screen of all projects, ordered by most deployments.